Writing the Code Is Only Half the Game: A Solo Checklist for Shipping to the Public Web
A project that runs fine on localhost hits a wall of new problems in public: domains, DNS, HTTPS, env vars, databases. This is a launch checklist for vibe coders — follow it step by step, with the why and the classic failure modes behind every step.

You got AI to help you finish your first working project. It looks great on localhost:3000, everything clicks through. Then the thought hits you: can I send a link so my friends can open it too?
That step is called "shipping". Don't underestimate it: a project that runs fine locally meets a whole set of problems that don't exist locally — where to buy a domain, how to configure DNS, why the browser says "not secure", why production can't read your env vars, where the database lives. Every one of these pits has been fallen into by countless people before you.
This is a checklist you can follow end to end. I'll tell you what to do at each step, which commands to use, and why the step exists at all — because someone who only knows the "how" will fall over again the moment they switch platforms; someone who knows the "why" can debug their way out anywhere.
First, figure out: what kind of "launch" does your project need
Don't buy a server the moment you start. Answer three questions first: does this project need a backend? A database? Long-lived connections like WebSockets or cron jobs?
Three "no"s — a blog, portfolio, landing page, docs site: go with static hosting. git push and you're live; the free tier is plenty for personal projects. One "yes": look at full-stack hosting. The mainstream options, one line each:
- Vercel: the natural home of frontend and Next.js, serverless functions out of the box,
vercel --prodships it in one command. The Hobby tier is free, but bandwidth is 100GB/month — image-heavy sites should watch out. - Netlify: the veteran of static sites, with form handling and serverless functions built in. The free tier covers small sites, and the UI is beginner-friendly.
- Cloudflare Pages: the most generous free tier, fast builds, and Workers can handle a surprising amount of backend work, with a global CDN baked in.
- Render: for people who want to run a Node/Python backend plus a database without touching Docker. Free web services sleep after 15 minutes without traffic — the first visitor has to wait for it to wake up.
- Fly.io: a real VM of your own, run any Docker image, install your own Postgres. Usage-based billing, usually a few dollars a month for small personal projects. Most freedom, steepest learning curve.
A beginner's formula: pure frontend → Vercel or Cloudflare Pages; Next.js full-stack (API routes, login) → Vercel; Python backend, scrapers, cron jobs → Render or Fly.io. Picking the wrong platform and migrating later hurts; ten minutes of thinking now beats redoing it after launch.
Buying a domain: three minutes on the name, three years on the renewal
A domain is your project's street address on the public web. Three things to think about before you buy.
Naming. Short, pronounceable, easy to spell — if you say it to a friend once and they can spell it, it's a good name. Stay clear of trademarks: don't sandwich a big company's brand into your name, a cease-and-desist is scarier than a 404. Search for same-named products before you commit, so you don't discover the collision on launch day.
Registrar.Cloudflare Registrar sells domains at cost with no markup on renewals — the most worry-free option for long-term ownership; Namecheap and Porkbun are solid too. If you're in China, Alibaba Cloud or Tencent Cloud work — but remember the ICP filing rules only apply to servers inside mainland China.
TLD reality check..com costs around ten-plus dollars for the first year and about the same to renew — the safest bet, pick it first; .dev is a similar price, but the whole TLD is HSTS-preloaded, meaning browsers will only ever talk HTTPS to it — your certificate has to be working from day one, no negotiation; .ai costs seventy to eighty dollars a year, every year — think twice before your project makes money. For any "$1 first year" promo, always check the renewal price before checkout — that's what you'll actually pay every year.
Hand your DNS to Cloudflare
Once you own a domain, the next step is telling the world "this domain points to that server" — that's DNS. Point your domain's nameservers at Cloudflare (the free plan is enough). The reasons are practical: free, fast DNS propagation, a free CDN, and one-click HTTPS certificate capability. One dashboard covers the next several steps.
Two rules for writing records:
- Apex (the bare domain,
example.comwithout www): write an A record pointing at the IP your platform gives you. Vercel uses76.76.21.21, Netlify uses75.2.60.5— copy it from the platform docs. - www and other subdomains: write a CNAME record pointing at the hostname the platform gives you, e.g.
cname.vercel-dns.com.
A classic apex pitfall: the DNS standard doesn't allow CNAME at the apex, and many registrars' built-in DNS won't accept it. Cloudflare does CNAME flattening, so CNAME at the apex works there. If you followed some tutorial, set a CNAME on the bare domain at another DNS provider, and it never resolves — don't doubt your sanity, just change the record type.
Watch the little cloud icon in Cloudflare: orange means proxied (traffic goes through Cloudflare first — that's what gives you the CDN and its certificate), grey means DNS only (straight to your server). When you're debugging a fresh domain binding, switch to grey first to confirm the service itself is fine, then turn the orange cloud back on.
Verify resolution with dig: dig +short example.com to check the returned IP; if you're impatient, query Cloudflare's DNS directly: dig @1.1.1.1 example.com +short. Remember this command — it comes back in the next section.
Environment variables: where most people crash
If you remember one sentence, remember this: .env never goes into git. API keys and database passwords committed to a public repo are the same as posting them on a billboard — scrapers can pick them up within minutes.
Do a hygiene check first: add .env* to .gitignore; if you already committed one by accident, kick it out of tracking with git rm --cached .env (note: that only stops future tracking — a key that's already in history must be revoked and rotated). Self-check anytime: git ls-files | grep -i env — any output means something slipped through.
Set production variables in the platform dashboard: Vercel under project Settings → Environment Variables, Render under the Environment tab. Hit Redeploy after changing them or nothing happens. To sync with local dev, don't hand-copy — pull them down with vercel env pull .env.local.
Crash-zone warning: build-time vs runtime variables. In Next.js, any variable starting with
NEXT_PUBLIC_is baked into the frontend JS bundle at build time. A real crash story: someone setNEXT_PUBLIC_API_URLto a staging address, built, shipped, noticed, fixed it to the production address, saved — and the frontend still used the old one. Why? The value was already packed into the JS files; changing a dashboard setting doesn't rewrite history. The only fix: change the variable, then rebuild and redeploy. Server-side variables likeDATABASE_URLare read at runtime — a redeploy (or even a restart) picks them up. When in doubt, ask: will this value end up in JS the browser downloads? If yes, it's a build-time variable.
HTTPS: you don't manage certs, but you must know how to verify them
The one-sentence version: hosting platforms like Vercel, Netlify, and Cloudflare use the ACME protocol to automatically request certificates from Let's Encrypt and renew them before expiry. All you do is click "add custom domain" in the platform, follow the DNS instructions, and it handles the rest.
"Automatic" doesn't mean "don't verify". After launch, do three things: click the lock icon in the browser address bar and confirm the certificate was issued for your domain; run curl -vI https://example.com and check the TLS handshake; check the expiry date: echo | openssl s_client -connect example.com:443 -servername example.com 2>/dev/null | openssl x509 -noout -dates.
Cloudflare users: turn on Always Use HTTPS so http redirects to https and search engines don't index two versions of your site. And HSTS (telling browsers "only ever come back over HTTPS") should not be enabled on day one — especially not HSTS Preload. Once includeSubDomains is on, one subdomain with a broken certificate breaks everything, and the HSTS cache in browsers is brutally hard to clear. Wait until your whole site has run cleanly on HTTPS for a few weeks, then consider it.
Databases and file storage: keep them out of git
If your project needs a database, three low-maintenance picks: Supabase (Postgres plus auth plus storage in one package, generous free tier — good when one person wants it all); Neon (serverless Postgres, usage-based, free tier has quota limits — good for low-traffic projects); PlanetScale (MySQL-flavored, whose free-tier policy has changed several times — check the pricing page before you commit, don't rely on old tutorials). Connection strings go in environment variables, never in code.
User uploads — images, videos — belong in object storage: Cloudflare R2 (S3-compatible, and its killer feature is zero egress fees) or AWS S3. Never stuff uploads into your git repo — GitHub rejects any single file over 100MB on push, and a bloated repo makes every clone miserable. Images belong in object storage.
One more thing to do on day one: confirm automatic backups are on for your database. The free tiers of Supabase and Neon both include daily backups or point-in-time recovery allowance. Don't wait until the day you drop a table to go looking.
After launch: errors and "is it still alive"
Once the site is live, the two things you fear most are: a bug nobody tells you about, and downtime nobody tells you about. Both have standard fixes.
Error tracking with Sentry. For a Next.js project, run npx @sentry/wizard@latest -i nextjs and keep hitting enter. After that, production errors arrive with full stack traces instead of a user screenshotting "it looks broken".
Uptime monitoring with Better Uptime (the free tier is enough) or self-hosted Uptime Kuma. Ping the homepage every few minutes; if it's down, you get an email or Telegram ping. Don't skip this because "nobody visits my tiny site" — you're the first person who needs to know it's down.
Logs live in the platform dashboard. On Vercel: Deployments → click a deployment → Runtime Logs; command-line folks can use vercel logs <deployment-url>. When something breaks, read the logs first — guessing is wrong far more often than you'd think.
Rollback plan: leave yourself a way back
Accept one fact before launch: you will ship a version with a bug. The only question is whether you can recover in 60 seconds.
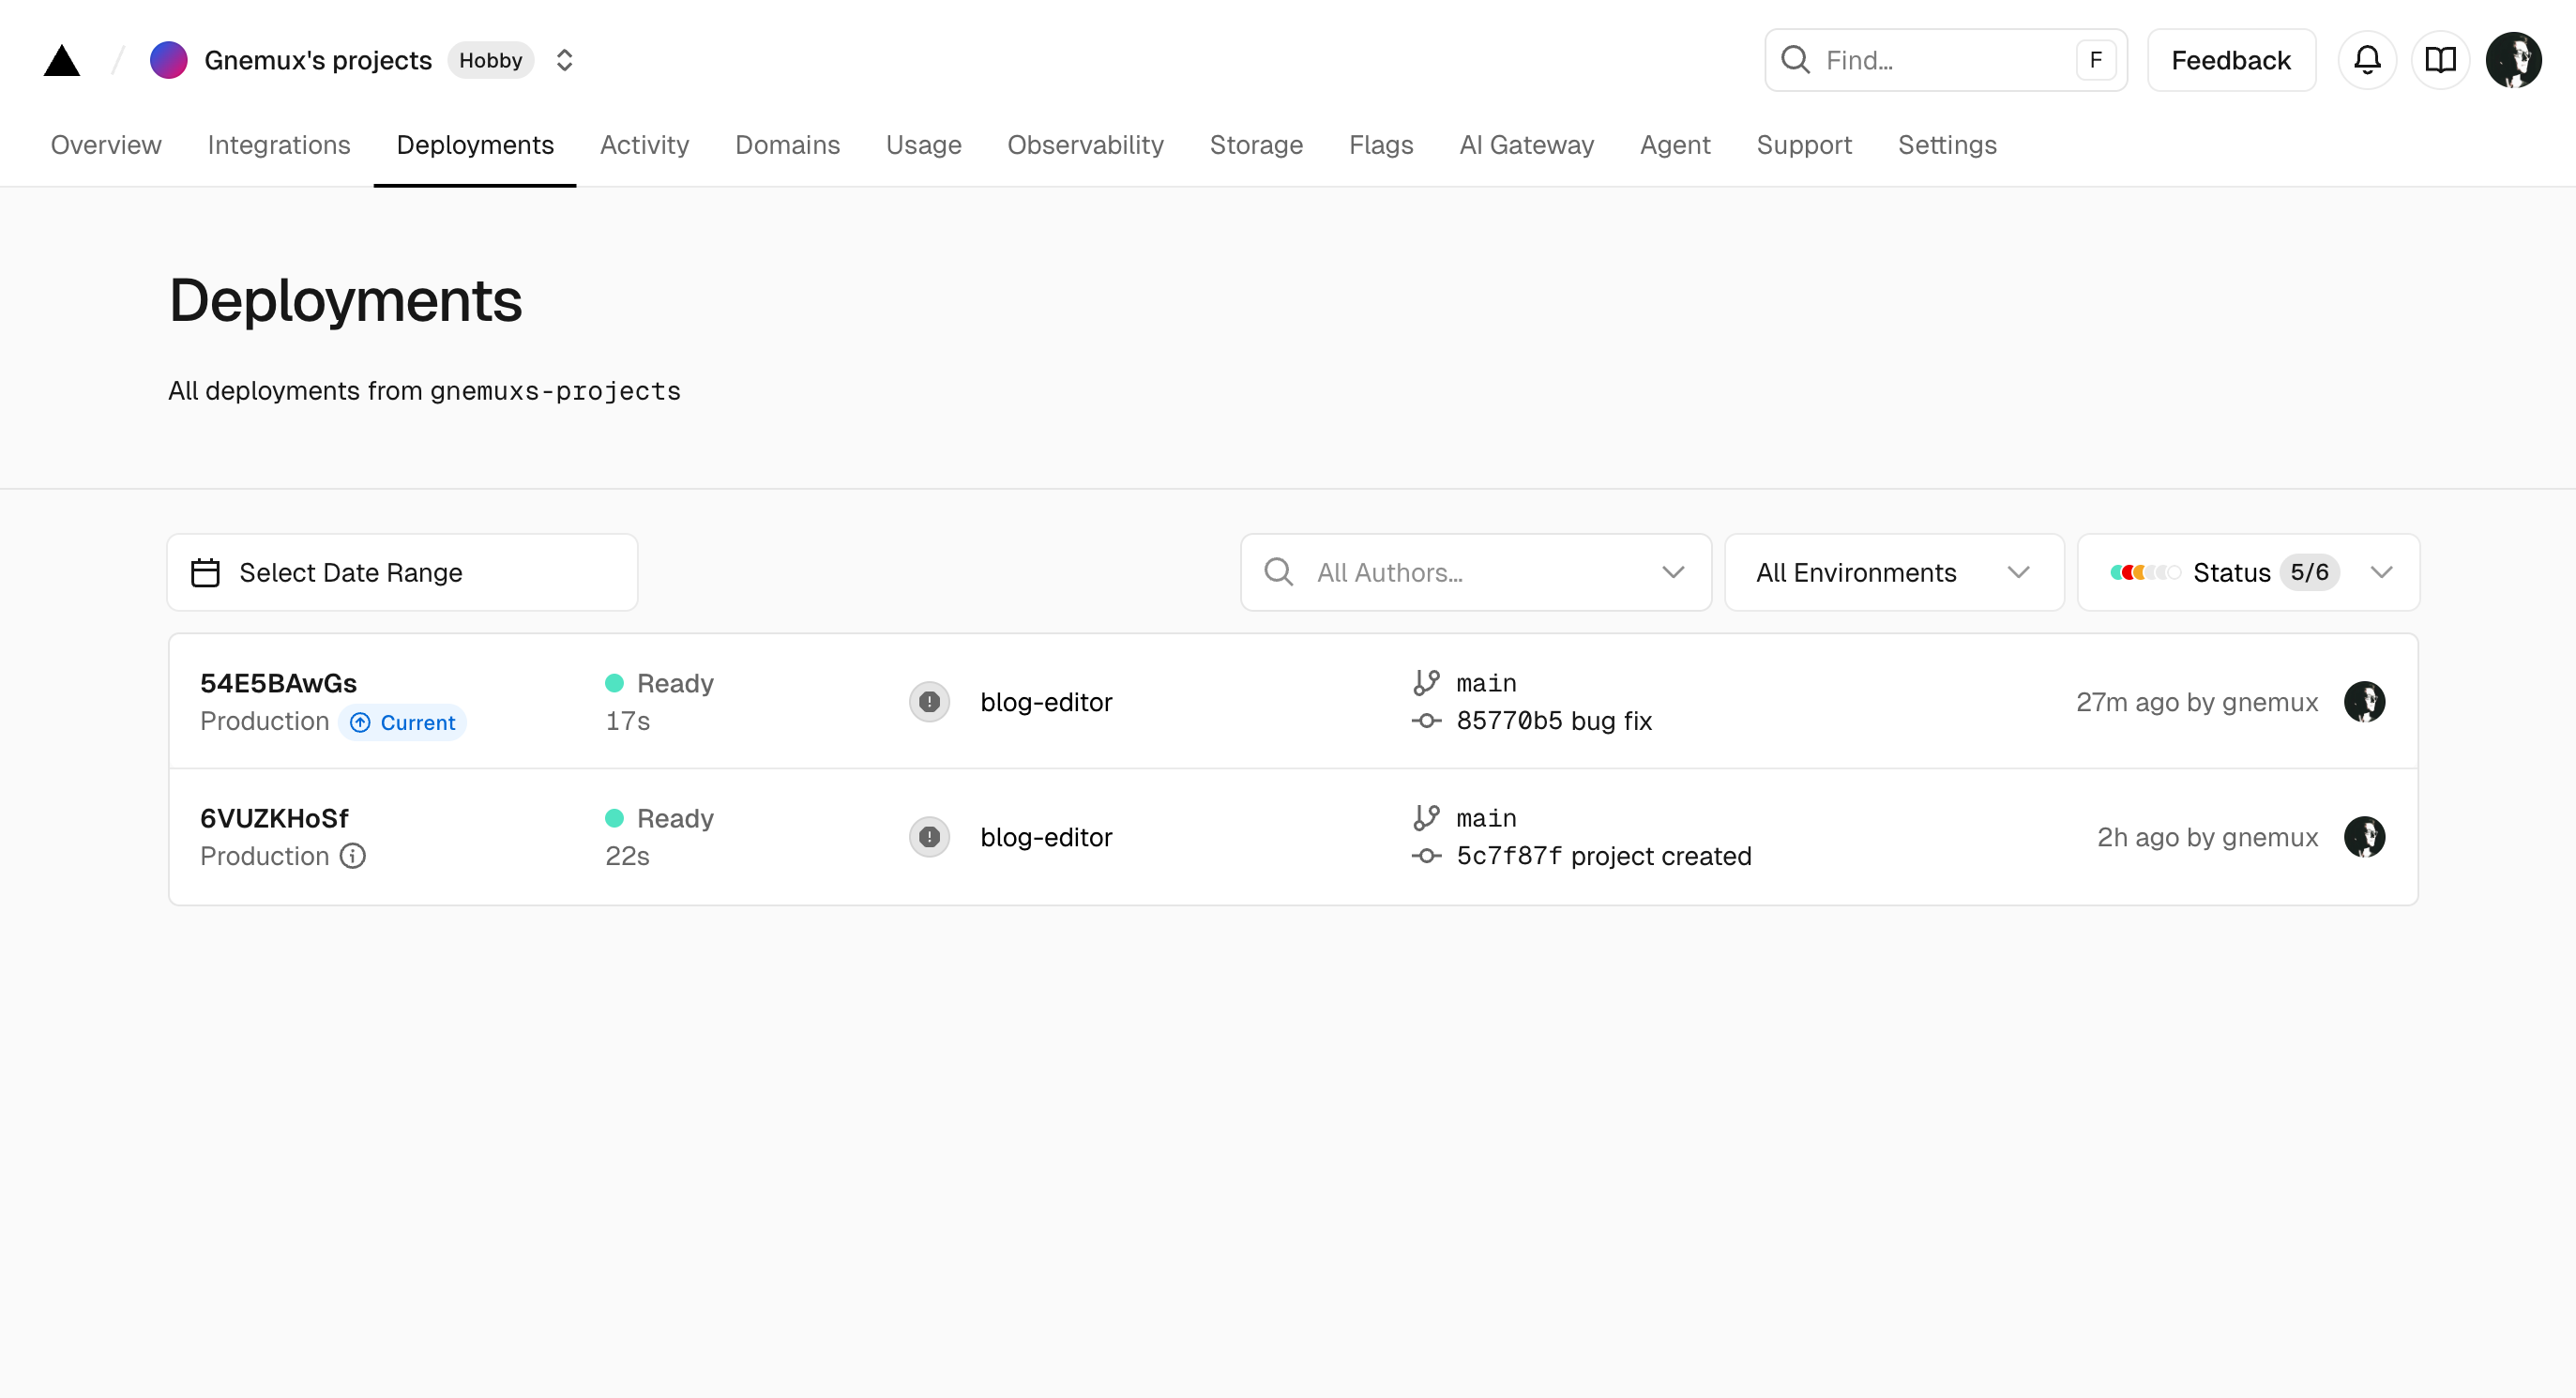
The good news: every deployment maps to a git commit, and the Deployments list on Vercel or Netlify is your time machine. Find the last healthy deployment, hit Promote to Production (or Rollback), and traffic switches back within seconds. Below is a screenshot of a real Vercel Deployments page — notice the commit messages and the Current marker on each deployment. Get into the habit of writing clear commit messages; future-you will be grateful at rollback time.
On the git side: fix small production bugs with git revert <commit>, which creates an inverse commit and keeps history clean. Don't git reset --hard on main and force-push — even solo, you can hurt yourself, e.g. another machine with a workspace sitting on the old commit.
Database migrations should be a "reversible" habit: every migration gets down logic; evolve schemas with expand-contract — add the new column first, dual-write, switch reads, then drop the old column. Never mix schema changes and data backfills in a single migration, or you'll find there's no way back when you need one.
Pre-launch checklist: tick them off
Ten minutes before you ship, verify each of these by hand:
- ☐ Does
dig +short example.comreturn the right IP? Andwww? - ☐ Does
https://open? Is the certificate issued for your domain? Doeshttp://redirect to https? - ☐ Are all env vars set in the platform dashboard? Did you rebuild after changing any
NEXT_PUBLIC_ones? - ☐ Walk the core flows by hand in production (signup, checkout, posting) — don't just check the homepage.
- ☐ Is there a 404 page? Do 500 errors swallow the stack trace (never leak raw errors to users)?
- ☐ Open it on your phone — are buttons tappable, text readable?
- ☐
.envisn't in git, right? Rungit ls-files | grep -i envone more time. - ☐ Can Sentry receive a test error? Is uptime monitoring configured?
- ☐ Are automatic database backups on?
The four most common crash scenes
1. Hitting "verify domain" before DNS propagates. After changing nameservers or records, run dig @1.1.1.1 example.com +short and confirm it's resolvable network-wide before clicking verify in the platform. A failed verification usually doesn't mean the platform is broken — the DNS just hasn't arrived yet. Get some water, wait a few minutes.
2. Hardcoding localhost in code.fetch("http://localhost:3000/api/...") works on your machine and dies everywhere else. API addresses go in environment variables; deploying frontend and backend on the same domain is the simplest setup and even saves you CORS trouble.
3. Committing an API key to a public repo. Revoke and rotate the key in the provider's dashboard first — this step is non-negotiable; deleting the repo or rewriting history can't un-leak a key. Then clean the git history (git filter-repo or BFG). Don't reverse the order.
4. Free-tier sleep makes the first visit spin forever. Render's free web services sleep after 15 minutes without traffic, and the first visitor waits tens of seconds for the cold start. Totally fine for a personal side project; if it's not, upgrade to a paid tier. Don't try to keep it awake with scheduled pings forever — that's an arms race against the platform you won't win.
Writing the code is only the first half. Nobody — not even AI — plays the second half for you: domains, DNS, certificates, env vars, every step walked by hand. But once you've walked it, you own something real, something other people can actually open. That feeling is something localhost can never give you.
Related articles

Every vibe project eventually needs scheduled jobs: daily syncs, expired-order cleanup, billing reconciliation, scheduled reports. AI's first version is usually setInterval — fine for dev, fatal in production. This guide maps four scheduling options, cron expressions and timezone traps, idempotency, distributed locks against overlap, failure retries and alerting, run-log observability, and cron endpoint auth — plus a launch checklist.

The Zephos team planted 16 launch-killer bugs in Notely, an agent-built Next.js + Supabase + Stripe notes app — two payment-related: unsigned webhooks accepted, pro granted from a self-declared client_reference_id. This guide turns those traps into a playbook: webhook signature verification, a server-side single source of truth, the subscription state machine, test clocks, and a launch checklist. Money logic must be hand-written or audited line by line.
Every vibe project hits the same moment: a list page firing a dozen DB queries per load, the database melting under modest traffic. This guide starts from the three-question caching mindset, then layers HTTP cache headers, Next.js data caching, Redis application caching with key design and the penetration/breakdown/avalanche defenses, and AI result caching (semantic cache, prompt caching), plus invalidation strategy and a launch checklist.